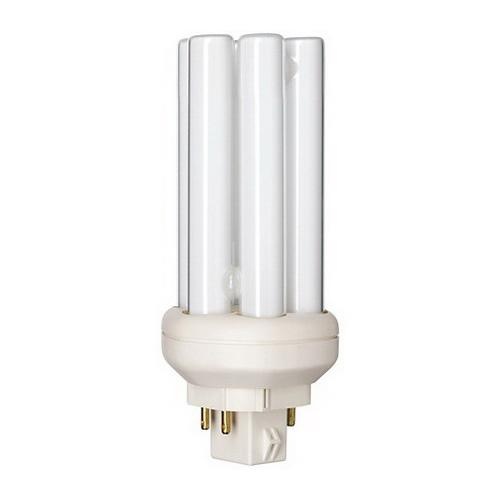
Monday 9 July 2018

CFL Choice- Full or Semi Spiral or Linear ?

There are a number of different designs of compact fluorescent lamps CFL on the market which can make it quite confusing to decide which is design is the best one to go for. Here we will look at the major types and review the advantages and disadvantages of these energy saving light bulbs.


Linear Tube CFL


The majority of the early CFL bulbs introduced in to the UK market were of the linear tube design as shown in the picture. . The linear CFL is just a long thin fluorescent tube which goes up vertically and then is looped back and this pattern can be repeated several times for high wattage light bulbs. These light bulbs are the cheapest to manufacturer and work well as an energy saving light bulb. The disadvantages of the linear CFL are two fold. Firstly, the look of the light bulb is rather cumbersome and quite odd certainly when compared to the traditional incandescent GLS bulb. It is not that the bulb is inherently gross from an aesthetic point of view but I think it is more the fact that the light bulb looks very different to what people generally expect a light bulb to look like and for this reason it is not rated highly from a visual perspective. The second issue is that because the design is thin and tall the bulbs are quite long in length and for this reason can be difficult to physically fit into a number of light fittings where there is a height restriction.


Semi Spiral CFL


The semi spiral light bulb has always been fairly common in the US market and has recently been introduced to the UK. The design of the CFL is shown in this picture. Again the semi spiral CFL is simply a long thin fluorescent tube which is looped around in a spiral shape but the first portion of the fluorescent tube just goes up vertically. Accordingly the semi spiral name is derived because this CFL is half linear and half spiral and therfore designated as a semi spiral. The overall look of the bulb is more akin to the traditional bulb and because of the fact that the fluorescent tube swings outwards it has a larger diameter than the linear CFL and accordingly the overall height can be reduced and the bulb will still produce a similar level of lumens output.


Full Spiral CFL

The final choice considered here is the full spiral CFL which is shown in this picture.

With the full spiral CFL the fluorescent tube spiral starts right at the base of the bulb and continues in a tight spiral to the top of the bulb. The benefits of this design is that because the spiral design is inherently more compact and because of the fact that the spiral starts lower, the overall dimensions of the bulb are less than the semi spiral CFL which gives it an overall more compact design. This is invariably important for the fitment into a number of closed light fittings or lanterns where there is a bulb height restriction. The aesthetic angle is clearly subjective and dependent on peoples individual views but I think that the compact proportions and shaping of the full spiral CFL make its looks more appealing than the semi spiral of linear CFL.

So from our perspective the Full Spiral CFL is the clear winner.


Click below to buy from our wide range of energy efficient CFL Lights

Monday 2 July 2018

A Guide to LED Emergency Lighting

LED Emergency lighting is usually meant for emergency situations where the primary power supply gets disconnected and every normal illumination fails. This could result from a power cut or a fire outbreak. It’s essential that LED emergency lighting automatically operates fully and provides sufficient illumination to enable all occupants to leave the premises safely.

So, if you are considering LED emergency lighting system, here is all you should know:

LED Emergency Lighting: The basics 


Most buildings nowadays incorporate sophisticated LED emergency lighting fixtures installed during construction; the design of equipment being chosen by the architect as per the current local authority requirements as well as Building Regulations. Emergency LED lighting is often sub-divided into standby lighting and emergency escape lighting.

Cost Matters

Generally, the decision to utilize a self-contained LED Emergency Lighting system or a central battery will probably be determined by cost. If an installation is durable and has low maintenance requirements, then central batteries, though quite expensive, might be ideal for larger projects. Typically, costs and luminaries are major issues of concern, especially on smaller jobs, and it’s this criterion that makes the self-contained systems more popular.

LED Emergency Lighting Driver Temperature

Ensure that your LED emergency lighting has been subjected to aging plus electronic load tests. This helps to ascertain whether the LED emergency lighting panels can withstand excessive temperatures. This guarantees performance, safety, and stability.

Emergency Escape Lighting

Emergency escape lighting refers to that part of the emergency lighting system, which supplies illumination for the safety of persons vacating a location or attempting to end a potentially hazardous process beforehand.

Standby Lighting

Standby lighting is often provided to allow normal activities to continue substantially without being changed.

Consultation and Design

The first thing to do when installing LED Emergency Lighting escape illumination is consultation and design. Both the fire risk assessor and the designer should meet and make comprehensive decisions on where the system is required and chalk up a plan illustrating the type of power supply, the locations to be covered, facilities, duration, and mode of operation.


Contact us for survey and consultaion service

The next step…..

Having decided on the type of LED emergency lighting system you’d like to install, then go ahead and choose specific positions for the lighting signs and units within specific premises. This will then help you choose the right equipment. Remember, emergency LED lighting signs should be carefully sited in order to create clear exit routes that lead to the ultimate exits from the building. Where the exit isn’t identifiable, a visible sign should be utilized instead of a lighting unit. Special concern should be paid to directional changes, individual stairways, floor level changes, corridor intersections, plant rooms, and toilet areas. Access to firefighting equipment as well as fire alarm call stations should be properly illuminated.

Mode of Operation

Mode of operation is a vital factor to consider when choosing LED Emergency lighting systems. Thus, you should take into considerations principle factors like maintained or non-maintained. The use of the premises in question determines whether to go for a maintained or non- maintained LED Emergency Lighting system.

LED Emergency Lighting Advantages

Installation is extremely fast and affordable
• Low hardware material costs
• Standard wiring material might be used
• Reduced maintenance costs
• Burn-through will automatically fulfill the need for luminaries to be lit
• No unique sub-circuit monitoring requirements
• Increased integrity and efficiency


LED Emergency Lighting: Disadvantages

Testing requires isolation
• With varying environmental conditions throughout the system, the batteries might be severely affected by high or low ambient temperatures
• Battery life is often limited to four years, depending on the application

 
Bottom line

LED Emergency Lighting systems have become very popular these days- thanks to their low energy consumption, efficiency, and flexibility. However, before you rush into getting your LED Emergency Lighting system, it is vital to understand the basics (what they are and how to choose the best). The above guide will help you in getting the best.


Source (Copyright © 2018 Saving Light Bulbs) — https://www.saving-light-bulbs.co.uk/blog/a-guide-to-led-emergency-lighting/

Wednesday 27 June 2018

LED Drivers - All You Need To Know

An LED driver refers to an electrical device that regulates the power supply to a string or LED. It responds to the changing needs of the LED device by providing a consistent amount of power as its electrical properties vary with temperature.

With outputs that are compatible with the electrical features of the LED, a LED driver may offer dimming through pulse width modulation circuits and may include several channels for separate control of various LEDs/LED arrays. Without the right drivers, LED fixtures may become extremely hot and unstable, thus causing poor performance or even permanent failure.

Different Types of
LED Drivers


There are many different types of LED drivers categorized by the output voltage, output current, maximum switching frequency, form of packaging, and supply voltage.

Each channel’s output can range between 250 µA and 50 A, with common chips carrying an output current of 20, 25, and 100 mA per channel. The commonly available voltage sizes are 2.3 to 5.5 V and 3 to 5.5 V. However, you can readily find LED drivers bearing a supply voltage of up to 630 V.

1 - Constant Voltage


Constant voltage LED drivers can be obtained in numerous manufacturing standards and are designed to meet high specifications for quality and efficiency.

2 - Dimmable LED Drivers


By dimming your LED lights, you get the freedom to enjoy different scenes. You can create a romantic atmosphere in the dining room, or establish a spectacular viewing experience for your guests during office presentations. You need a dependable LED driver that meets all electrical requirements if you want to dim your LED lighting system.

Dimmable LED Drivers: Understanding LED Driver Dimmer Controls

LED drivers with dimming capability offer the flexibility of dimming the lights from 0-100% while maintaining color and temperature. Remember, dimming an LED light can also reduce the operating temperature of your fixture, ultimately boosting LED efficacy as well as lamp life.

In the olden days, LEDs and dimmers weren’t always so expedient. But as technology advanced, powerful dimming controls entered the market to add more definition to their performance. To effectively control your LED light intensities, you’ll need to fix a dimmer that’s compatible with the LED driver you intend to use.

3.0-10V Dimming Drivers

LED technology is virtually taking the market by storm. Complimenting a 0-10V dimmer with an already power-efficient LED lighting is not only efficient but also effective. A LED lighting high-quality dimmer (powered by ERP LED driver) can help users save big on costs associated with energy consumption. Moreover, they assume a superior control capability when compared to other lighting applications.

LED Drivers: Their Applications

LED drivers can be used as:

- Industrial, outdoor, residential, and commercial lighting
- Automotive interior, tail lights, and portable flashlight
- Signage and LED backlighting
- Garden and elevator lighting


LED Drivers: How to Select the Right LED Driver

When you’re searching for reliable LED drivers, you should take into consideration several attributes, including Output Voltage, Supply Voltage (-0.3 to 20 V, 2.7 to 5.5 V, and 3 to 5.5), as well as Maximum Switching Frequency ( between 200 Hz and 200GHz). You’ll be able to get the right chip that’s suitable for use as a high-power LED driver, dimmable LED driver, constant current LED driver, RGB driver or 24v LED driver on an integrated circuit or any other circuits that might require such driver chips.
 

Now we hope you are familiar with LED drivers, so shop your own LED driver with SLB.

Click below to see our catalouge of Standard as well as Dimmable LED Drivers (Both Contant Current and Constant Voltage).

https://www.saving-light-bulbs.co.uk/accessories-and-controls/led-drivers

Source (Copyright © 2018 Saving Light Bulbs) — https://www.saving-light-bulbs.co.uk/blog/led-drivers-all-you-need-to-know/

Tuesday 26 June 2018

Factors Affecting the Effectiveness of Illumination

 
The effectiveness of illumination is usually affected by several factors, including light quantity & quality, contrast, amount of flicker, shadows, and intensity of glare. To optimize illumination in security, emergency, and safety situations, consider adjusting each factor differently. Lighting standards also play an important role in the design, installation, durability, and efficient distribution of illumination.

Measuring and stimulating Light Level – Illuminance

Illuminance is measured in foot candles (ftcd, fc, fcd) or lux (in the metric SI system). A foot candle is actually one lumen of light density per square foot; one lux is one lumen per square meter.

• 1 lux = 1 lumen / sq. meter = 0.0001 phot = 0.0929 foot candle (ftcd, fcd)
• 1 phot = 1 lumen / sq. centimeter = 10000 lumens / sq. meter = 10000 lux
• 1 foot candle (ftcd, fcd) = 1 lumen / sq. ft. = 10.752 lux

 
Calculating Illumination

Illumination is calculated using the formula = Ll Cu LLF / Al (1). In this formula, I denotes illumination (measured in lux, i.e. lumen per m2), Ll represents lumens/ lamp (i.e. lumen), Cu is the coefficient of utilization, while LLF is light loss factor and Al is the area/ lamp (measured in m2).

Light Planning: The Steps

Light planning is a five-step process. The actual process involves:

 - Planning objective analysis
 - Planning conditions analyses
 - Overall planning
 - Detailed planning
 - Documentation


Understanding Glare


Glare can be categorized into two groups: discomfort and disability glare. The level of discomfort glare can be measured by determining the glare index in accordance to the UGR method. This is often graded on a scale, which ranges between 13 and 28 where the greater the glare index the greater the degree of glare. The smallest variation in the glare index designating a significant difference is three.

Reflections from reflective glare or materials can usually be avoided by adopting the following strategies:

· Choosing convenient luminaire positioning
· Using materials for all reflective surfaces
· Selecting fixture with effective screening and low luminous intensity
· Picking out luminaires with a bigger surface area
· Choosing light colors for your ceilings and walls


Balance is key

A well-balanced luminance is essential to boost visual clarity, effectiveness of the ocular functions of the eye, and contrast sensitivity. You should always avoid high luminance which can cause glare, intense luminance contrasts that may cause visual tiredness, and low luminance contrasts, which trigger a staid atmosphere that doesn’t stimulate.


Source (Copyright © 2018 Saving Light Bulbs)

Sunday 24 June 2018

How to Calculate LUX Level & Number of Lights Required in a Room

Basis of LUX and Lumens


The measurement for the light level encountered in a room or for an exterior space is LUX. The measurement of the light output from a lamp is lumens. Although 1 lumen will theoretically produce 1 LUX of light over an area of 1 square metre this is only in the perfect world as there are other factors to consider. For instance the decor and colouring in the space will undoubtedly result  in some loss of light unless the room was had perfectly reflecting mirrored walls.

The Calculation of LUX level in a room

The LUX level in a room is calculated from the following formula

E(LUX) = F(lm) x UF x MF / A

Where

- E is the the LUX level achieved

- F is the average lumens value form the light source

- UF is the utilisation factor for the space which takes into account the colouring of the surfaces in the space together with the geometry

- MF is the maintenance factor for the lamp which allows for a level of light depreciation over time.

It is clear to see from this formula that the light level experienced is reduced by the 2 factors which are the maintenance factor of the lamp and the utilisation factor of the space.

Clearly these values are situation dependent but typical values for these would be 0.4 for the utilisation factor and 0.9 for the maintenance  factor. This means that in a real situation you would achieve typically 35% of the light level that could theoretically be achieved in an optically perfect space.

What LUX levels are needed in a Room?

The level of LUX needed in a space is obviously subjective but here are some examples to provide some indication of what is needed.

Areas for relaxation for instance lounge or TV rooms would typically have 120 LUX. For an area which where it is necessary to read in it would be advisable to increase this to 200LUX. A domestic office environment of office for occasional use could be illuminated to a level of 250 LUX. It would be advisable to illuminate a commercial office area to a level of 400-500 LUX but where the majority of work is computer based a lower level is acceptable. For a retail environment where people are purchasing goods then a level of around 500 LUX is typically used. In a work shop area or area where detail work is undertaken then a LUX level of between 500 and 700 is desirable. Within an operating theatre in a hospital a LUX level or around 1000 would typically be used.


Recommended Lux Levels by Application and Age:

Application
Recommended Lux Age 25-65
Recommended Lux Age 65+
Warehouse
100
200
Work area
150
300
General assembly
1,000
2,000
Detailed assembly
2,000
4,000
Fine inspection
5,000
10,000


Recommended lux levels for general work conditions. Source: IES Handbook.

Calculation of how many lights are needed in a room?

Simply by turning the formula around it is possible to work out how many lights are needed for a room. This is particularly useful when working our how many spot lights or ceiling lights are needed in a space.

N = Ex A/(FxUFxMF)

So be example for a large space which is 10x 10m with 700 lumens ceiling lights , taking a maintenance factor of 0.9 and a utilisation factor of 0.7 then 45 lights would be needed to provide a LUX level of 200.

For a Kitchen which is 5 x 3 metre and using downlighters which produce 430 lumens output then for 180LUX you would need 10 downlighters taking the same factors as before.
 

If you are not comfortable with mathematical calculations, then please use below calculator to calculate the number of lights required based on your Lux level requirement.

Number of Lights Required

I do hope that helps, but if you have any questions please feel free to get in touch with us at SLB for some advise.

Source (Copyright © 2018 Saving Light Bulbs) — https://www.saving-light-bulbs.co.uk/blog/how-to-calculate-the-lux-level-in-a-room/

Saturday 23 June 2018

Why Light Output Should Be Measured In Lumens & Not Watts


As light emitting diodes become the standard lighting, it is important to understand the dissimilarities between watts and lumens, as well as how to establish the right amount of lumens for achieving optimum atmosphere in a space

Lumens vs. Watts

Let’s get to understand what lumens are: The lumen is an international scientific measurement standard for the quantity of light generated by a specific light source or its measured brightness. On the other hand, Watts measure the required amount of energy necessary for operating a light source.

The only challenge here is that there isn’t a mathematical formula to convert watts to lumens, like in converting kilograms (Kgs) to miles.

But still below chart will help you in choosing lights based on output Lumens:


Think Lumens, and Not Watts

The advent of LED technology (which is more energy efficient) has changed the lighting landscape. It has rendered the use of conventional bulbs meaningless. Unfortunately, this rapid change in technology has made the old-fashioned “Watt” light measurement less able to accurately indicate the bulb brightness. This does not allow for the different efficiency in conventional types of lights (i.e. filament bulbs, halogen & fluorescent) and LEDs.  This is why light output should be measured in Lumens and not watts.

Thus, the energy industry is now opting to use a more stable as well as widely-accurate unit to measure light intensity commonly known as Lumens.

Understanding Lumens

Lumens (abbreviated as lm) is a measure of light emitted by a lamp/ bulb (but it must be visible with the naked eye). The greater the Lumens number, the brighter the light.


Understanding Watts

On the other hand, watts don’t measure the brightness, rather the amount of electricity used.

Bulb Luminous Efficacy

The effectiveness of bulbs is expressed in terms of the lumen-to-watt ratio. This is the number of lumens produced for each and every watt consumed.

The rate of conversion of watts to lumens by bulbs varies and is dependent on the technology used. Lighting bulbs producing more L/P (i.e. lumens-per-watt) are cheaper to run since they generate more light and use less power.

LEDs possess the highest L/W ratio—what this means is that they are capable of generating a higher amount of light (from the bulb in question) for relatively little energy.

Longer-Lasting and Energy-Saving LEDs

The introduction of LEDs tremendously reduced power parameter requirement for buyers. This is because you’ll be getting a bulb fixture that’ll cost you 90% less as far as your electricity bills are concerned. What’s more, these bulbs are likely to last longer. Producing less heat as compared to incandescent bulbs helps LEDs to realize a 50,000 hr. lifespan.

So, when shopping around for a replacement lighting bulb, think of lighting fixture that’s brighter, longer-lasting, as well as more energy-efficient—the LEDs.

Lumens vs. Candelas

The two measurements can be confusing and are similar. However, they have subtle differences. Lumens are used to measure the amount of light emitted (i.e. the total visible amount of lights from a given source). This is also known as its luminous flux. On the other hand, candelas are used to measure the luminous intensity. It is also important to note that candelas are more predominant in America, while the EU prefer lumens.


Now since you have fair idea about Lumens, therefore please check out our LED Lights with high Lumens output

https://www.saving-light-bulbs.co.uk/commerical-leds

Wednesday 20 June 2018

Buying Exclusive LED Flat Panels: The Secrets

With tens of thousands of LED panels manufacturers as well as suppliers in today’s marketplace, it might prove hard to choose the best ones. As such, you must be careful, especially if it is your first time with the LED revolution. A quick glance should offer you the LED insights so as you can pick exclusive LED products capable of saving a substantial amount of power and even last longer. So, the following factors should be of help to you in deciding the best LED panels that can serve you for many years to come.

Light Guide Plate Plus its Driver


The LED panel’s quality is dependent on the light guide plate along with its driver. The light guide plate determines the light transmittance as well as power conversion efficiency. The power factor and the lifespan of the whole light system are determined by the driver. As such, it’s vital to ensure that you don’t compromise on the quality of these two important factors when purchasing panels. For instance, the 600×600 led ceiling panel has been manufactured with precision to serve you for years to come.

The Right Panel System

Now that you understand how crucial the two are, let’s deep dive into how you can select the right LED panel system:

Selecting LED Light Guide Plate: Go for panels that feature light guide plates and those with PMMA light guide plates after only half year of usage, such as the 600×600 led panel. Well, PS materials are popular in most countries across the globe, thanks to their affordability. However, it can easily turn yellow and get dark spots something that can decrease the panel’s power conversion efficiency. Moreover, PMMA material has an ant-aging and possesses superior light transmittance capacity as compared to PS materials.

Selecting LED Light Panel Driver – Large driver cripples are the major cause of LED light flickers. Typically, a superior PF value must come with a flicker, which cannot be detected by a naked human eye but. Since a low PF value driver utilizes lots of energy as well as power, a predetermined PF value is needed on LED drivers (typically 10+w panel lights). Due to the high cost, existing drivers with high PF value mostly have flicker.

Other Performance Factors

The following factors should also be considered before purchasing LED panels for your specific needed.

Aluminum Frame


Go for LED flat panel lights (like the 600×600 led panel) that utilize aluminum housing (environmentally friendly) featuring rapid heat dissipation, anodized, as well as anti-corrosion properties since they are long lasting and have superior performance. Some of the shortcomings of inferior aluminum panels are low heat dissipation capacity, general weakness, reduced chip life and rapid fading light.

LED Light Panel Driver Temperature

You should ensure that your manufacturer has conducted aging and electronic load tests on the LED panels. This is to ascertain whether the panels can bear extreme temperatures (101℃-138℃). Panels that pass this test tend to perform better, are safer, and stable, which makes them long-lasting. You can count on panels like 600×600 led ceiling panel when it comes to bearing extreme temperatures. 

Insurance and Warranty

Insurance is meant to protect LED panels against manufacturing defects and assure you of the product warranty. The manufacturer in question must offer you full support when it comes to warranty claims and subsequent repairs/ replacements.

LED Light Luminous Efficiency

Ensure that the luminous efficiency of your LED flat panel light is 120l+m/w. Also, check that it has no flicker and has a top power efficiency of 0.9+. Also ensure that:

• It has high CRI (Ra>80)
• The THD is less than 15%
• The DLC is under 4.0 standards.


Checkout Our High Quality LED Panles

Click to Buy Led Panels

Article Source (Copyright © 2018 Saving Light Bulbs) — https://www.saving-light-bulbs.co.uk/blog/buying-exclusive-led-flat-panels-the-secrets/


Tuesday 19 June 2018

Dimmable LED’s

LED’s are changing and transforming lights as well as saving money, which is all well and good but what if you want the LED’s to be dimmable?

You’ll be pleased to know that LED’s can be dimmable! However this isn’t necessarily easy… All bulbs are on circuits and dimmable bulbs have to be on circuits that are compatible with their design in order for their brightness to vary. There are mainly two types of LED’s available on the market; dimmable and non-dimmable.


If you are switching from incandescent to LED’s therewill be a few things that you need to look out for. In order to be dimmable, all bulbs will be attached to a driver which will help them to dim steadily and effectively. However, these drivers cannot be used in conjunction with LED’s because their circuitry is not co0-10v LED Driver Controllermpatible. Traditional dimmers reduce the voltage used by the fixture to then reduce the amount of light that it emitted, but this wouldn’t work with LED’s because they would still give off the same amount of light even if the voltage is reduced.

It can be possible to use a dimmable LED in a non-dimmable circuit although this would defeat the purpose, but should the wrong bulbs have been bought etc, the bulb wouldn’t need to have a compatible driver to dim so would be shining like normal.  A non-dimmable bulb definitely can’t be put in a dimmable circuit though because it could cause damage to the bulb and/or the circuit.

What can happen to the bulb/circuit if they are incompatible?

 
There can be a variety of effects that can happen if the incorrect bulb is put into the incorrect circuit. The worst being that the bulb doesn’t turn on because the circuit can’t function and therefore prevents the bulb from emitting any light. Other effects can be that the bulb doesn’t dim but only works at 100% brightness, which isn’t ideal if you are wanting to great a mood or atmosphere with the lighting. Another situation is the bulb works (yay!) but hums which isn’t what lighting was created to do! Bulbs making noise is never a good sign, and points to the bulb becoming damaged. Finally, a very common problem is that the bulb flickers, either all the time or at certain dimmer levels. This is also very damaging to the bulb and likely to the circuit as well. Electricians are needed to change dimmer switches, but once this change has happened you’ll be good to go!

Lighting can be a practical and beautiful way to light your home but also create great atmospheres throughout. Dimmable lights are especially good at this because visual appearances can be altered and moods can be changed. Dimmable LED’s are even better because they save energy as well as still being able to change everything else! So don’t be put off by the confusion of dimmable LED’s and non-dimmable LED’s, upgrade and convert both your bulbs and dimmers and start saving money! Hopefully this article has illuminated what you need to look out for with dimmable LED’s and what could need to be changed in order for everything to work as it should. If you have any further questions or want to talk drivers, please get in touch and we will help you as best we can.


Checkout our wide range of dimmable and non-dimmable LED bulbs
https://www.saving-light-bulbs.co.uk/led-bulbs-lamps/led-gls


Wednesday 28 March 2018

Color Characteristics of LEDS

There’s an array of different LEDs that are available in the lighting market today. The diverse LED characteristics comprise of light color or radiation wavelength and light intensity among other features. 

These color characteristics are as a result of an assortment of factors during the manufacturing process. Factors such as semiconductor make-up, fabrication technology used, and encapsulation are also important in determining the LED color appearances.

Understanding LED colors

Color is a fundamental feature of light emitting diodes (LEDs). Initially, there were a limited number of colors available for these fixtures. You could only find red LEDs.
However, as technology advanced, there have been significant improvements in LED materials and colors.

Color Characteristics of LEDs: Color Temperature

One important aspect of color appearance is color temperature, which exemplifies how cool/bluish or how warm/yellowish technically white light appears. CCT Correlated Color Temperature (abbreviated as CCT), is actually a metric correlating the source of light appearance to a pre-heated theoretic dark/black body appearance. As a black-hued body gets hotter, it becomes red, orange, white, and ultimately blue. The CCT value of a light source, provided in Kelvin (K), represents the temperature at which a hot black body closely matches the light source color under investigation. It symbolizes the color of emitted light and not that of illuminated objects.

What is Color Rendering Index (CRI)?

Metrics Color representation has numerous distinct forms, including reference based systems, gamut based systems, and systems which are built upon sophisticated color appearance models.
CRI refers to a measure of fidelity (that’s how ‘true’ a certain light source is when related to a reference source), but it doesn’t address the issue of color appeal and discrimination.

Chromaticity and LED Colors


Chromaticity refers to an objective interpretation of the quality of color irrespective of its luminance. It consists of two distinct parameters, often described as colorfulness (s) and hue (h). For a specified CCT, a light source with a positive Duv value has a chromaticity which falls above the locus of the blackbody (appearing slightly greenish), while a source featuring a negative Duv value has a chromaticity which falls below the locus the blackbody (appearing slightly pinkish).


The Influence of LED voltage drops

The LED voltage drop often lies between 2 and 4 volts. The actual voltage that occurs across the two terminals is highly dependent on the type of LED/materials used and influences the color of LED in question.

As expected, the voltage curve of an LED broadly resembles that of a forward diode characteristic. But once the diode is switched on, the voltage becomes relatively flat for various forward current levels.

LED Characteristics: The Summary

The following table gives a summarized insight concerning LED color characteristics.


Wavelength Range In NMColor Of the LEDVoltage(V) at 20MAThe Type of Material
Blow 400UV(Ultraviolent)3.1 to 4.4AIN, AlGaN, AlGalnP
400 to 450Violet2.8 to 4.0GaP,AlGalnP
450 to 500Blue2.5 to 3.7lnGaN
500 to 570Green1.9 to 4.0GaP, AlGalnP
570 to 590Yellow2.1 to 2.2GaAsP, AlGalnP
590 to 610Orange or Amber2.0 to 2.1GaAsP, AlGalnP
610 to 760Red1.6 to 2.0AlGaAs, GaAsP, AlGalnP


Below 760InfraredBelow 1.9GaAs, AlGaAs

Besides LED color, the following are other major LED specifications:
  • Light intensity value( denoted as Iv)
  • Current vs. voltage specification
  • Reverse voltage
  • Angle of view
LED Specifications for Operational Life

LED’s light intensity doesn’t diminish with time. What this implies is that LEDs have a specific operational life. This specification helps determine the application of different kinds of LEDs. LED specifications are determined by the following formulas.

L70% = The time taken for a 70 percent illumination (this is also known as lumen maintenance)

L50% = The time taken for a 50 percent illumination (also known as lumen maintenance)

Note: According to LED standards, your LEDs shouldn’t exhibit any major shift in chromaticity.
These figures’ rationale is that 70 percent lumen maintenance is equated to a 30 percent light output reduction. This’s an approximate threshold figure required to detect to gradual light output reductions.

Retro Style Meets Modern Efficiency: An Introduction To LED Filament Bulbs

  In the evolving landscape of home lighting, the fusion of vintage charm with contemporary efficiency has given rise to a unique lighting...